Drucker/Scanner
Das WEH besitzt einen schwarz/weiß-Laserdrucker vom Typ Kyocera ECOSYS P3260dn und einen Farbdrucker mit eingebautem Scanner Kyocera ECOSYS M8124cidn.
Diese Geräte stehen allen Mitgliedern des WEH e.V.s zur Verfügung.
Preisliste
DISCLAMER: Aus verwaltungstechnischen Gründen verwenden wir printing unit, statt Seitenzahlen. Eine Druckeinheit kostet 1 Cent.
In deiner Abrechnung werden also die Anzahl der Druckeinheiten/die Kosten in Cent aufgeführt, nicht die Anzahl der gedruckten Seiten.
Der Drucker steht im Lernraum auf dem Erdgeschoss, vom Haupteingang aus hinten rechts.
Setup
You can use the Web-Printer to print PDF files without any further installation. To print other files, you must first convert them to PDF locally and then print them.
Printing with the web printer is currently implemented for both the black and white printer and color printer. Printing in black and white costs 2 cents per page, in color 8 cents per page. Note that if you select the "Color" option, it will automatically be printed with the color printer and will cost 8 cents per page accordingly, regardless of whether the document itself is in color.
Alternatively, you can quickly find the Web-Printer on the home page!

The scanner (multi-function printer) can be found on the ground floor in the study room next to the black and white printer. Using the scanner is free of charge and only for members of the association. Here is a short guide.
Please handle the device responsibly!
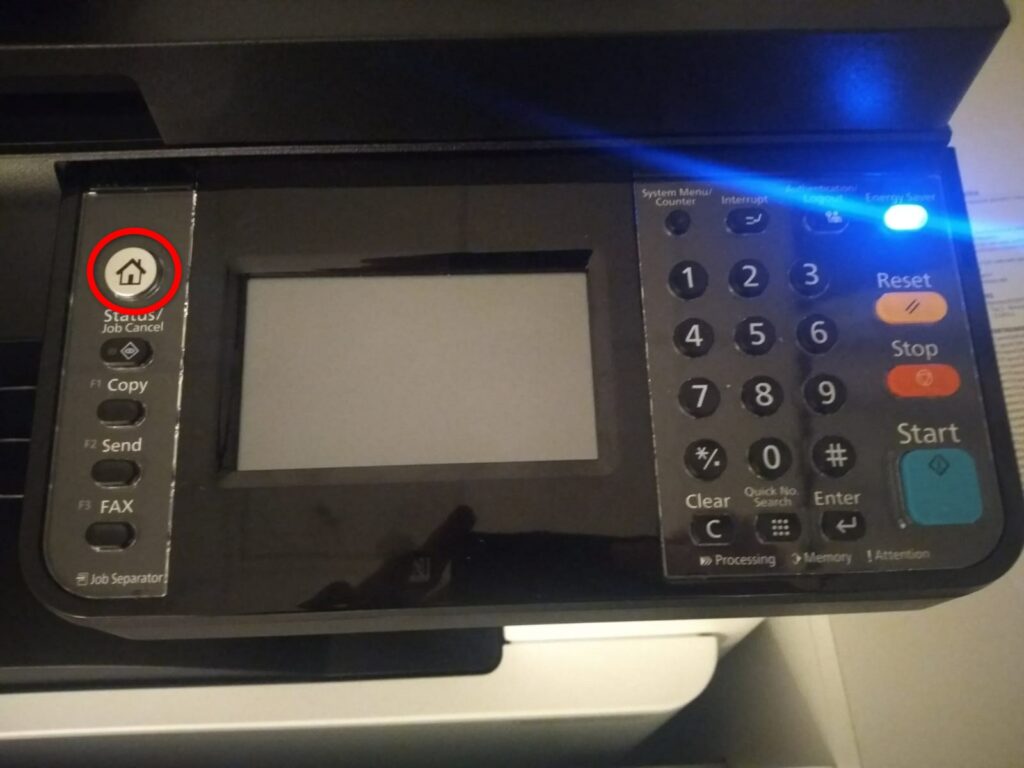
Press "Home" to wake the device from sleep mode.
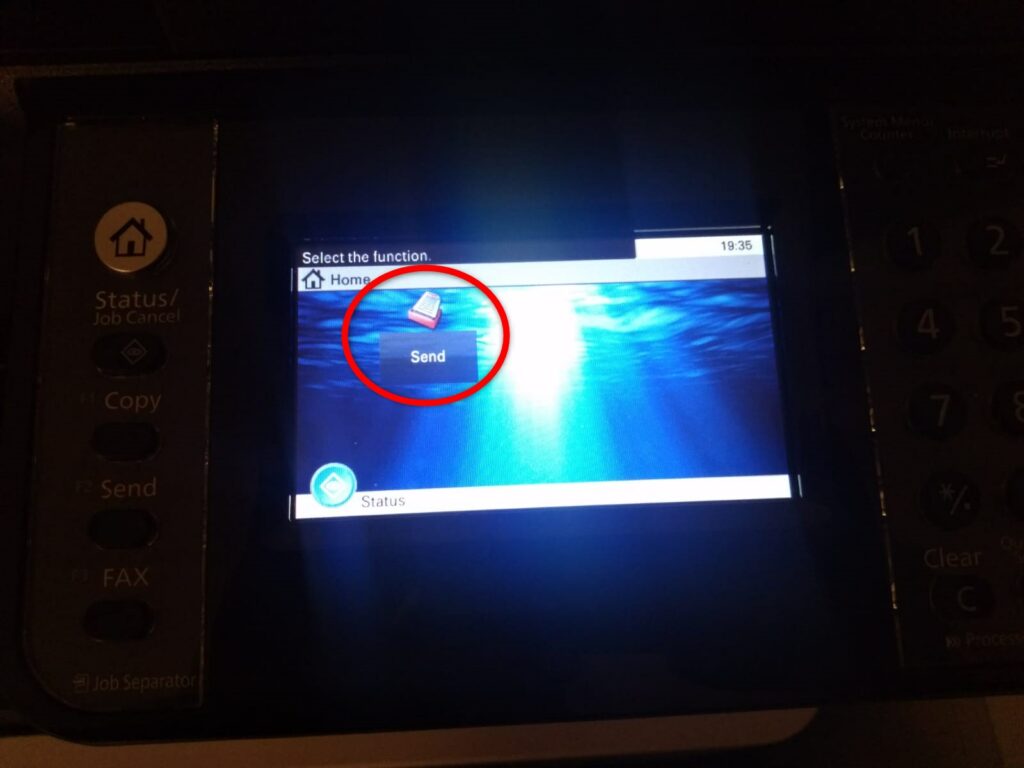
Choose "Send".
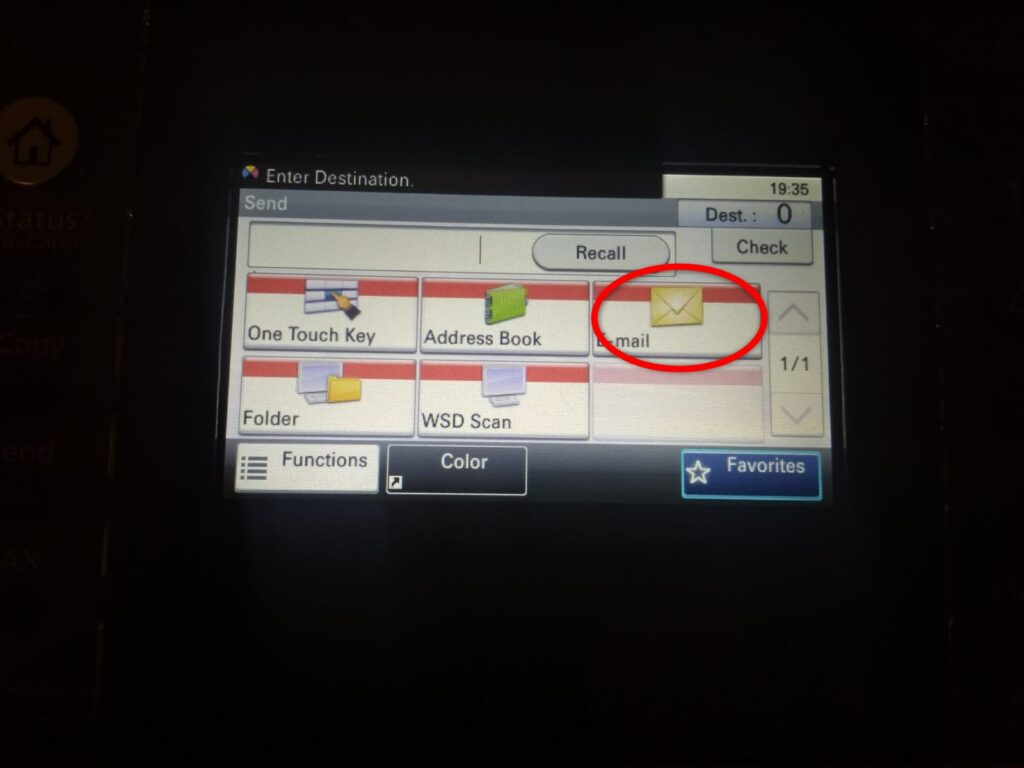
Drücken Sie auf E-Mail und gebe deine E-Mail-Adresse ein. (Es muss keine “@weh” Mailadresse sein)
Es gibt zwei Möglichkeiten Dokumente einzuscannen:
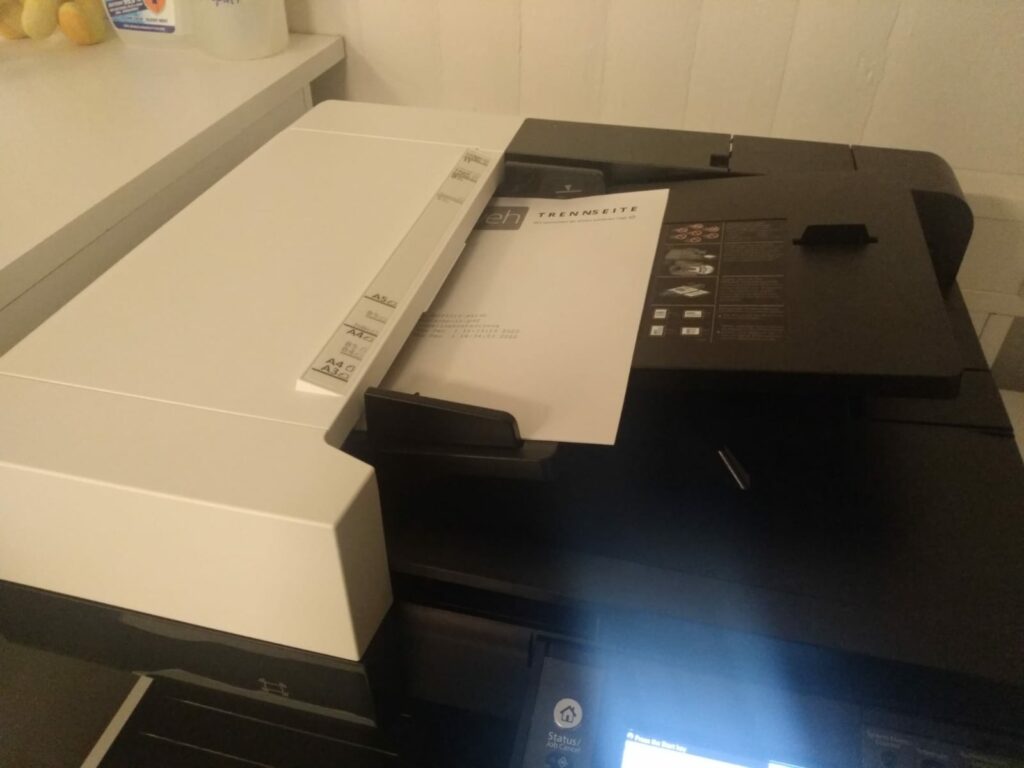
You can either scan them in a stack - maximum 100 pages, one-sided. Only enter clean pages - no paperclips, no adhesive or dirty pages.

Alternatively you can scan pages one by one. If you scan thick books or similar items do not press on the cover hard.
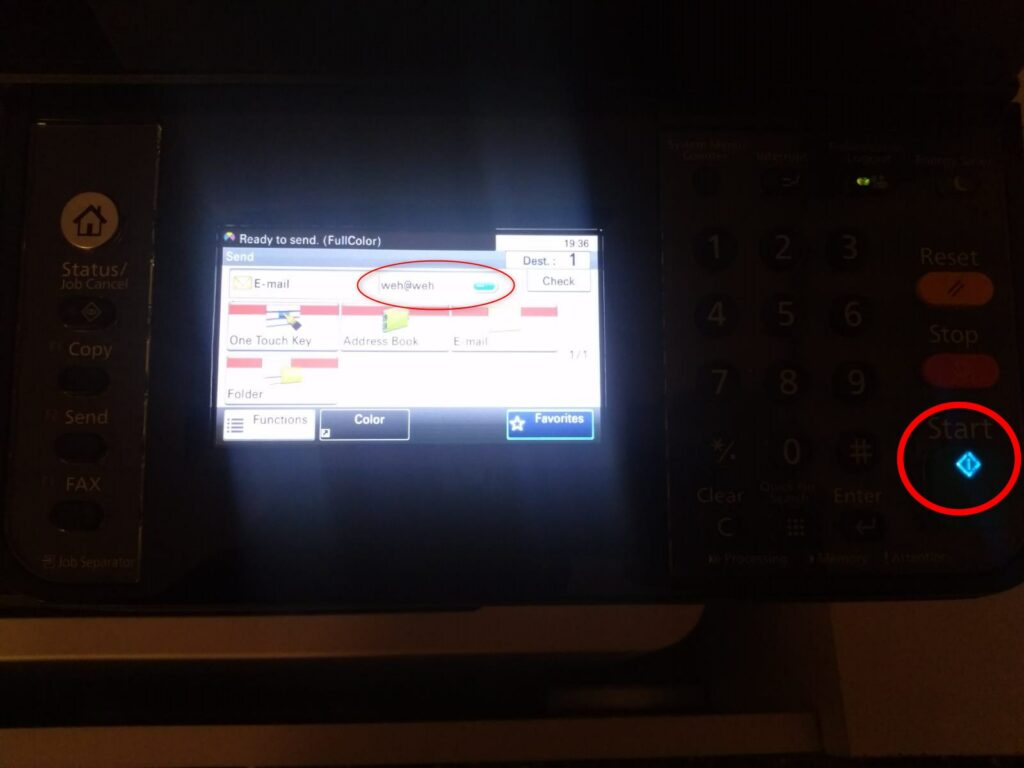
Am Ende einfach auf “Start” drücken und das gescannte Dokument wird an die angegebene E-Mail-Adresse verschickt.
DISCLAMER
This is a "legacy feature" that is no longer supported by NetzAG. It is currently not possible for new residents to install the printer. Instead, you can use our web printer, which does not require installation.
Step 0: Currently, you need to install the SSL Certificate first. You can find the instructions in the SSL Certificate (SSL Zertifikat) tab above.
Step 1: Open “Printers & scanners” (for example over the search function) and press “Add a printer or scanner”.
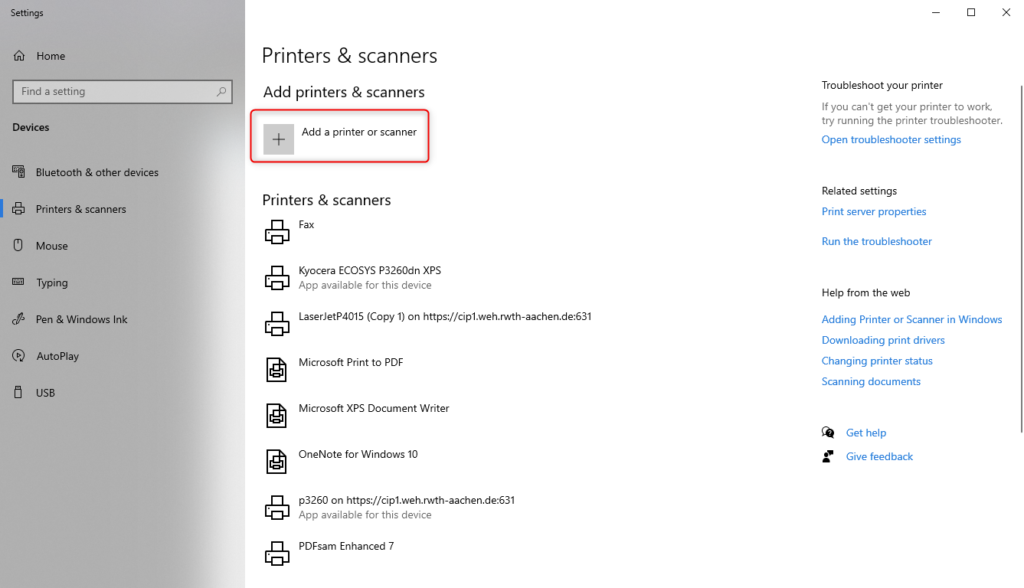
Step 2: After a moment, the option “The printer that I want isn’t listed” will apper. Select it.
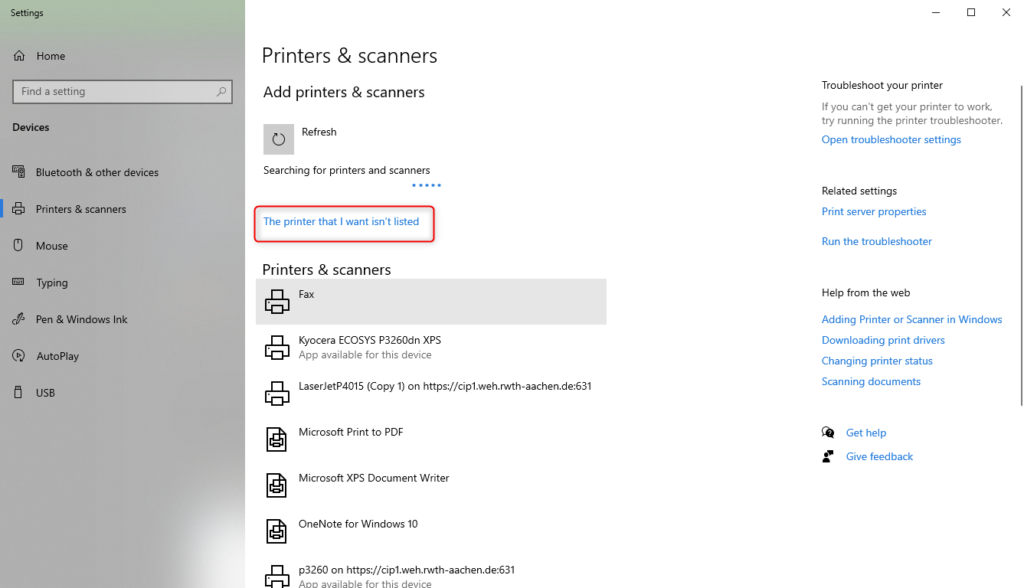
Step 3: Enter the printer address (different from the old printer): https://cip1.weh.rwth-aachen.de:631/printers/p3260 and press “Next”.

Step 4: Select the drivers for Kyocera ECOSYS P3260dn XPS and press “OK”. If this driver is not shown, you can either download it from the manufacturers website or use a standard PLC6 driver (for example “Microsoft PCL6 Class Driver”).

Step 5: Finish the installation by pressing “OK”, “Next”, “Finish” etc. (whatever comes up).
Step 6: Go back to “Printers & scanners”, find the new printer (p3260 – see photo) and press “Manage”.
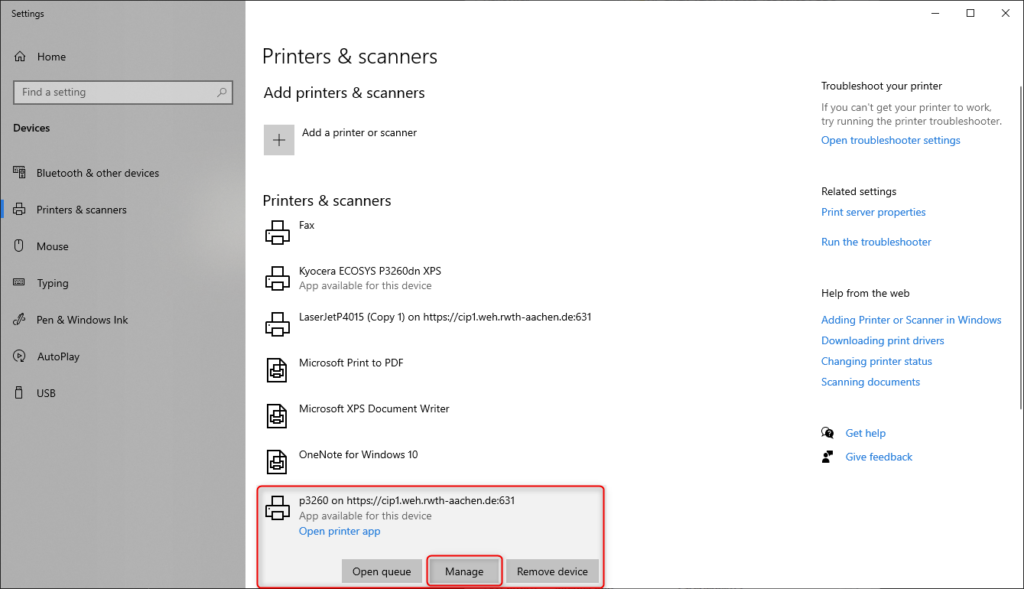
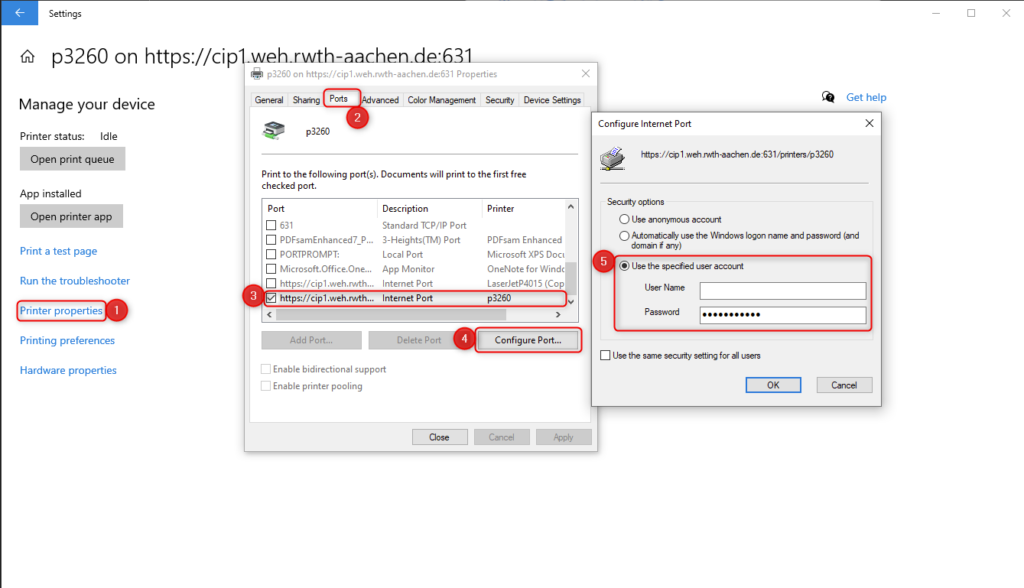
Step 7: Open “Printer properties”->”Ports”, select the correct port and press “Configure Port…”. Then choose “Use the specified user account” and enter your house-username and password (the same for email, booking system etc.). Then press “OK” and “Apply”.
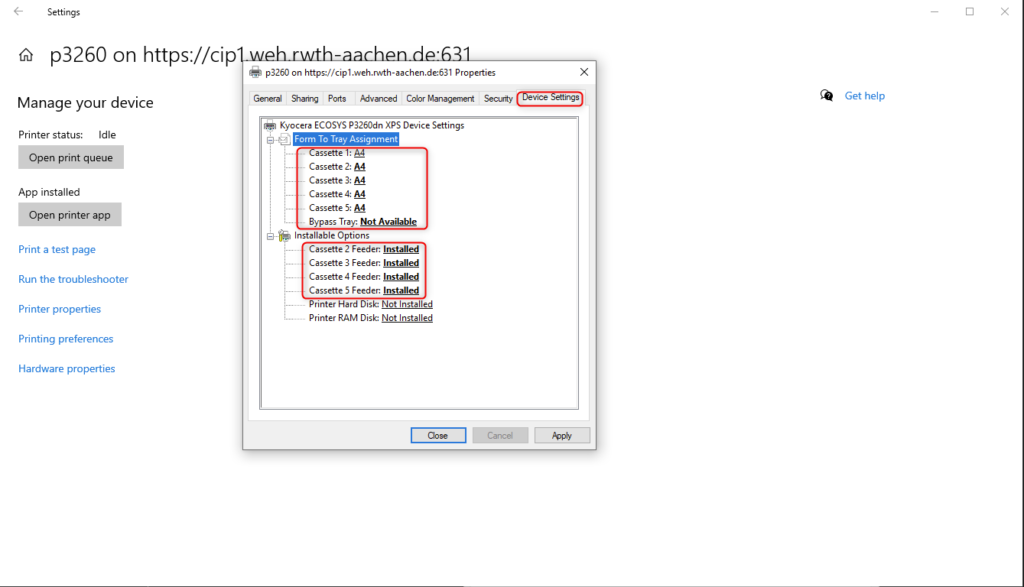
Step 8: Go do device setting and make sure all the cassette feeders are set to “Installed” and “A4”. Then Press “Apply”.
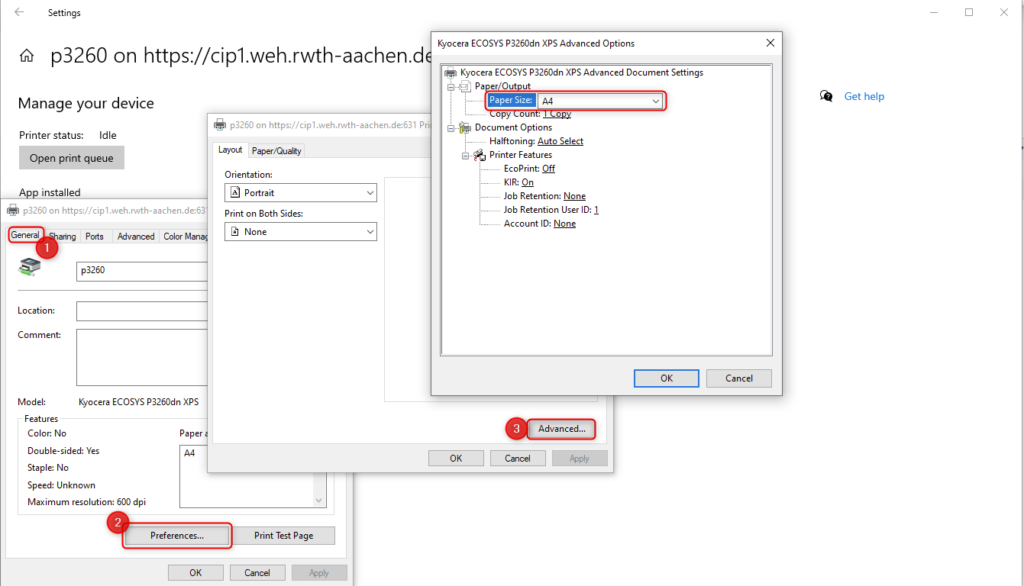
Step 9: Go to “General”->”Preferences…”->”Advanced…” and make sure your default paper format is set to A4. Then press “OK”, “Apply”, “Apply”.
You are all set! Make sure you choose the correct printer when printing documents. Unfortunately, there is currently no cover page when printing with the new drivers.
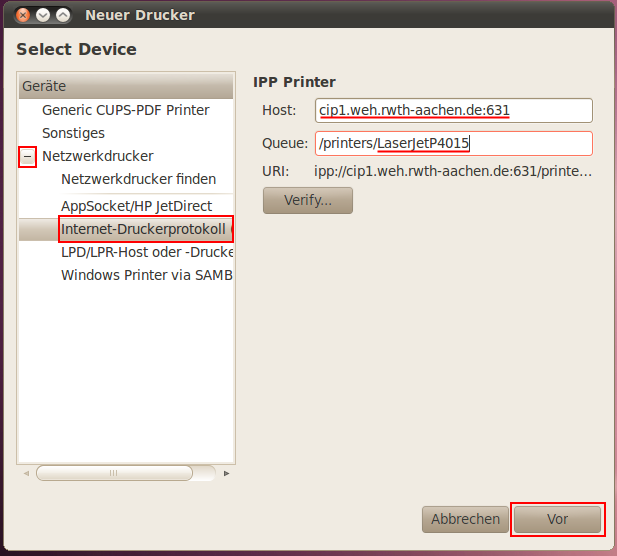
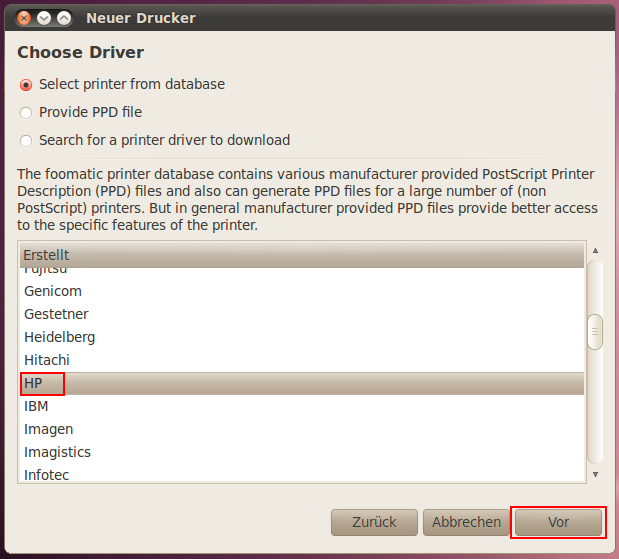
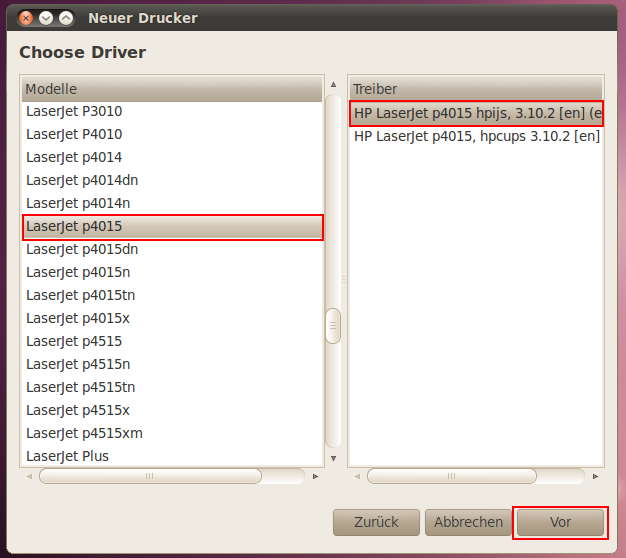
Unser alter Drucker HP LaserJetP4015 hatte ein schönes Leben, doch nun ist er an einem besseren Ort. Wie dem auch sei, hier wurden einige Tutorials zur Einrichtung dieses Druckers geschrieben, die euch bestimmt noch weiterhelfen können. Beachtet nur bitte folgende Änderungen:
Neue Adresse: https://cip1.weh.rwth-aachen.de:631/printers/p3260
Neuer Treiber: Kyocera ECOSYS P3260dn XPS
Schritt 1: Systemsteuerung – Geräte und Drucker anzeigen – Drucker hinzufügen
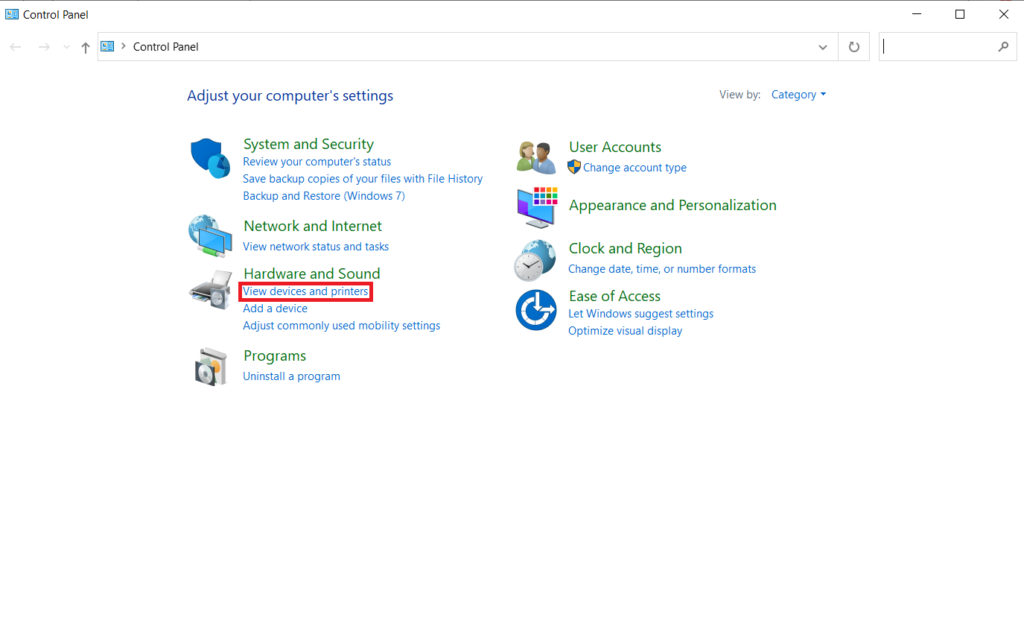
Schritt 2: “Der gewünschte Drucker ist nicht in der Liste enthalten.” anklicken.
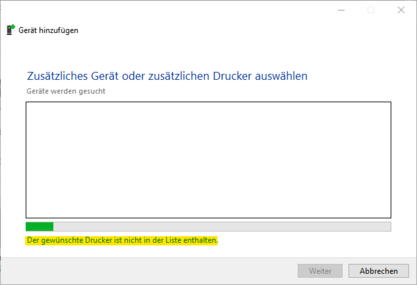
Schritt 3: “Freigegeben Drucker über den Namen auswählen” wählen und als URL
https://cip1.weh.rwth-aachen.de:631/printers/LaserJetP4015
eintragen.

Step 4: Den Druckertreiber auswählen. Erst Links HP, dann rechts HP Universal Printing PCL 6 (ganz unten) auswählen. Wenn eines der beiden nicht aufgeführt ist auf Windows Update klicken und warten (bis zu 15min).

Schritt 5: Ok, weiter, ja und Fertig stellen (in beliebiger Reihenfolge, beliebig oft).
Schritt 6: Unter Geräte und Drucker rechstklick auf LaserJetP4015 – Druckereigenschaften dann in den Tab Anschlüsse. LaserJetP4015 auswählen und “Konfigurieren…”.

Schritt 7: Deine Haus-Credentials eingeben. Mit OK bestätigen.

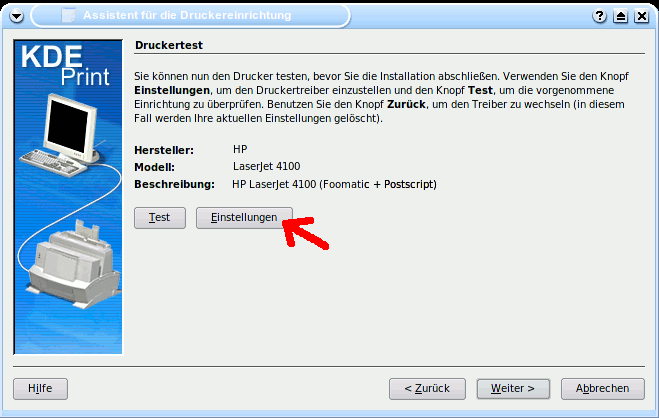
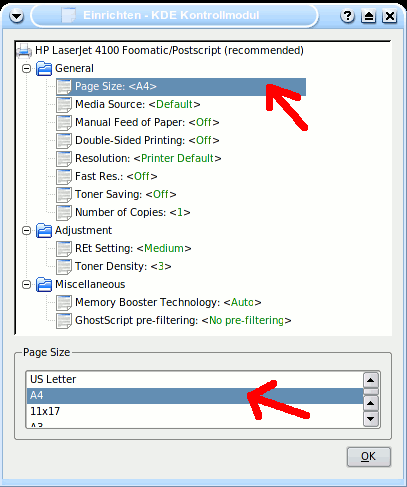
WICHTIG: Vor dem Drucken immer sicherstellen, dass der Drucker auf DIN A4 eingestellt ist. Das wird gemacht, indem man Druckereigenschaften öffnet und danach auf Geräteeinstellungen klickt. Dann sollen die Formate im Bild unten auf DIN A4 geändert werden.
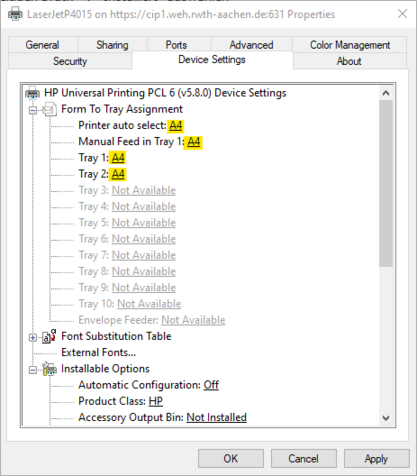
Schritt 8: Um doppelseitig drucken zu können, muss der Treiber wissen, dass der Drucker einen Duplexer hat. Dazu soll man wieder in den Druckereigenschaften auf Geräteeinstellungen klicken. Danach “Modul für beidseitigen Druck” auf “Installiert” setzen.

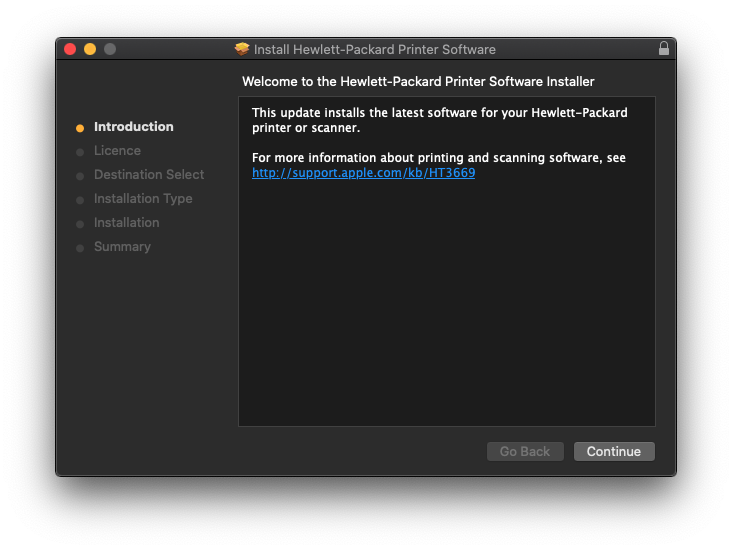
Installiere zuerst die Treiber für den Drucker über folgenden Link:
Druckertreiber für macOS
Füge nun über die Systemeinstellungen den Drucker hinzu. Wähle “IP” aus und gebe die folgenden Informationen ein:
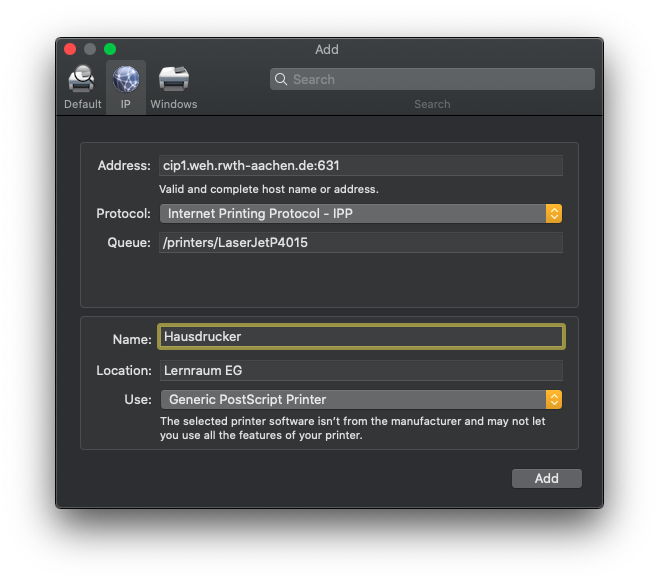
Wähle nun den Druckertreiber aus, indem du auf “Generischer PostScript-Drucker” gehst, und “Wähle Software…” auswählst:
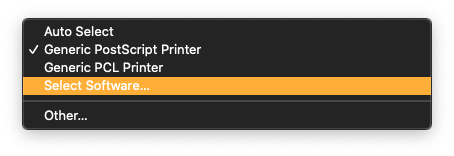
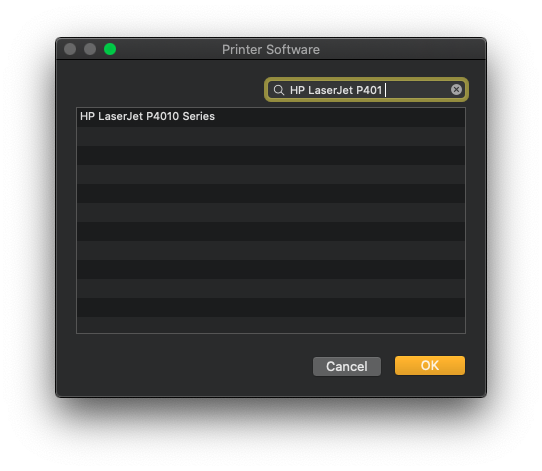
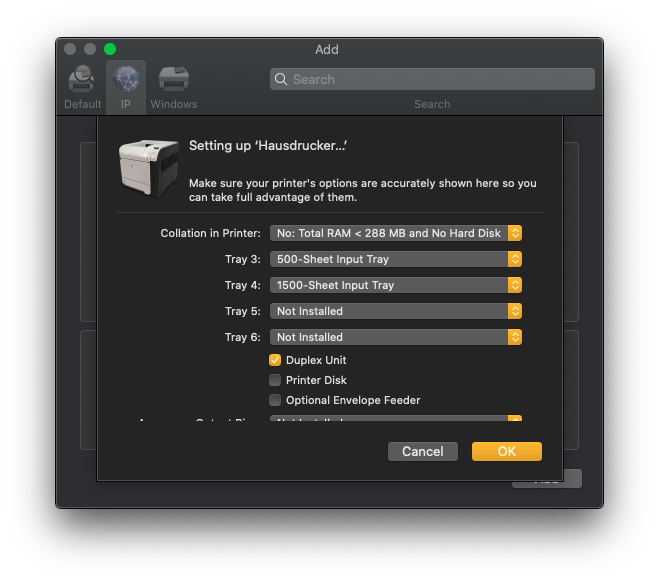
Konfiguriere den Drucker selbst, indem du “Duplex-Einheit” auswählst und für die Trays die korrekte Konfiguration auswählst, wie unten zu sehen ist:
Öffne nun die Systemeinstellungen und wähle den Hausdrucker aus. Stelle sicher, dass die Papiergröße auf A4 eingestellt ist!
Öffne nun die Warteschlange und drucke eine Testseite. Warte bis bei dem Druckauftrag “Hold for Authentication” angezeigt wird.
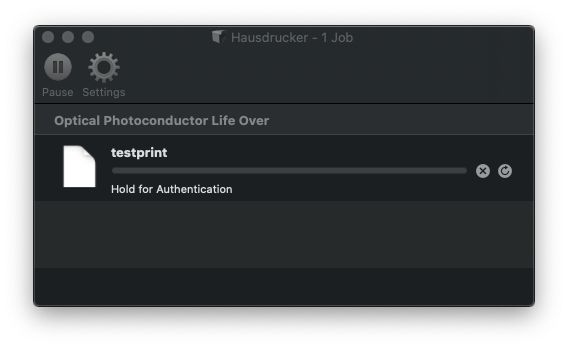
Drücke nun den kleinen runden Knopf mit dem Pfeil bei dem Druckauftrag und gebe deine Haus-Credentials ein. Wähle “Passwort im Schlüsselbund sichern” aus. Warte bis die Testseite gedruckt worden ist, danach ist der Drucker erfolgreich eingerichtet.
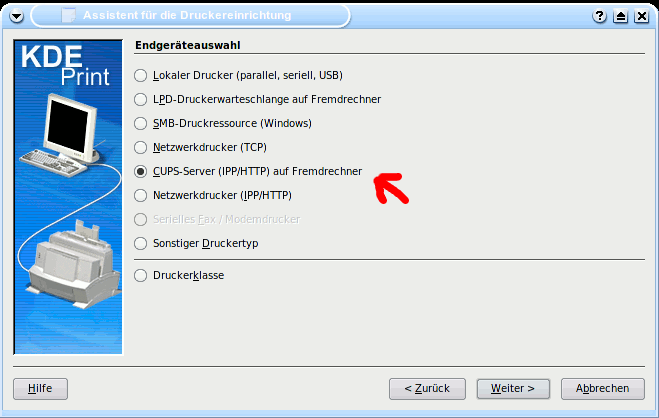
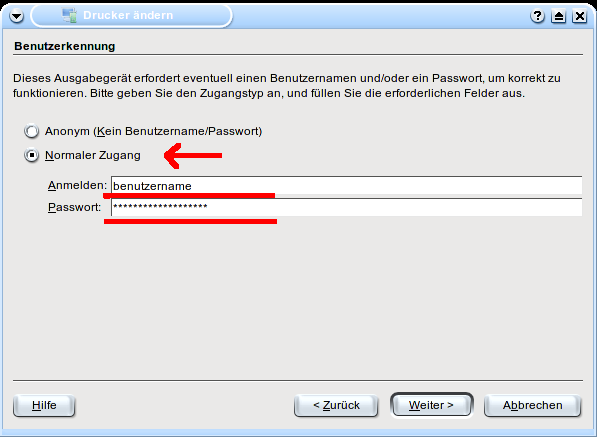
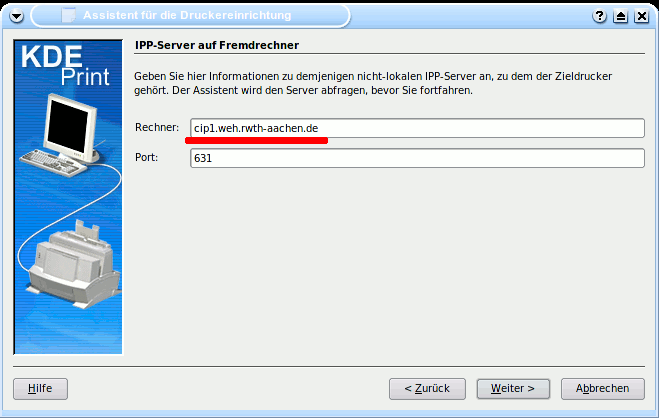
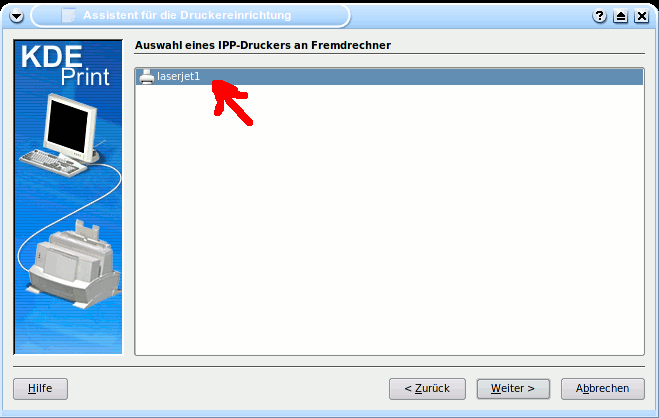



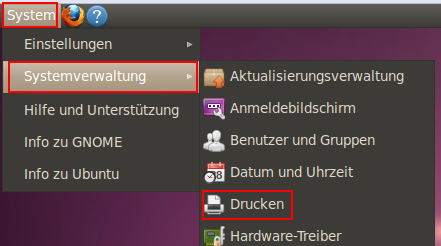
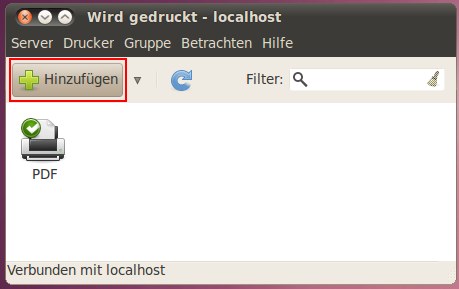
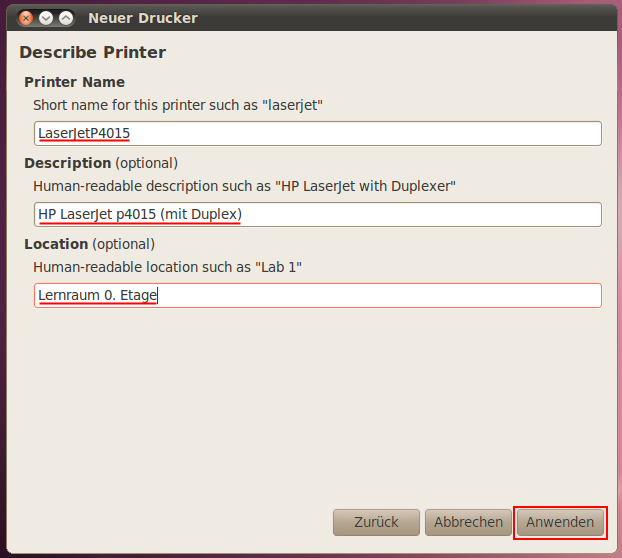
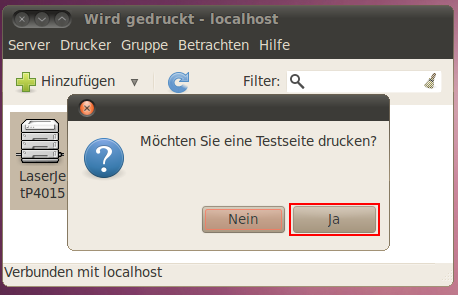
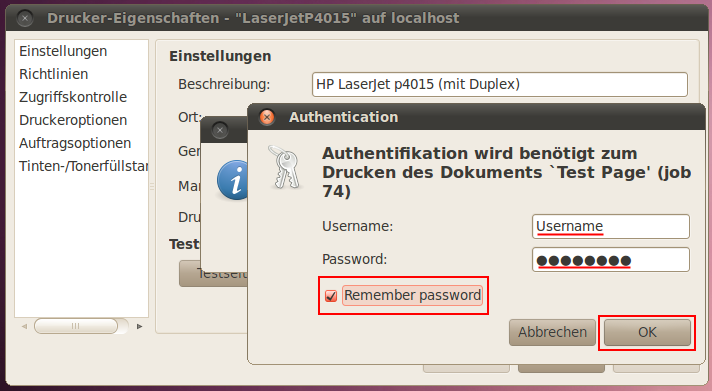
Hier bei Username deinen Benutzernamen eintragen, den du bei der Anmeldung zu den Netzdiensten des WEH erhalten hast (das, was vor dem @ deiner Hausmailadresse steht: username@weh.rwth-aachen.de). Unter Password dein Passwort. Um nicht bei jedem Druckauftrag nach dem Passwort gefragt zu werden, bei Remember password einen Haken setzen. Bestätigen mit “Ok“.
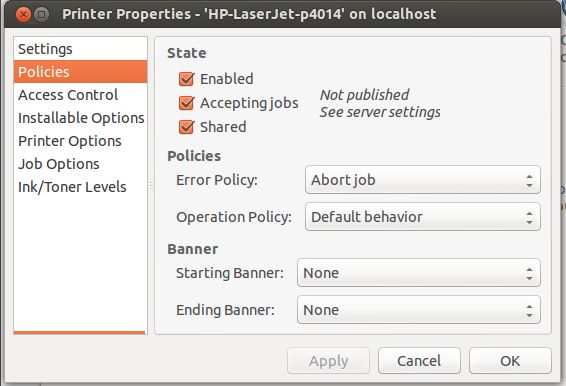
Unter http://linuxwiki.de/CommonUnixPrintingSystem/MultiPlattformPrintServer gibt es gute Anleitungen für weitere Betriebssysteme.
Falls ihr Hilfe benötigt, kontaktiert uns und wir schauen, ob wir helfen können.
DISCLAMER
This is a "legacy feature" that is no longer supported by NetzAG. It is currently not possible for new residents to install the printer. Instead, you can use our web printer, which does not require installation.
WARNING: Depending on the document type, the printer can in some cases recognize which pages need color and which do not, and take this into account when calculating the costs. (During testing it worked for text files like .odt, but not for .pdf). If the printer classifies a black and white page as "color" when printing, there will be no refund and you will have to pay the corresponding cost for color printing. Accordingly, we strongly recommend using the stand-alone black and white printer for black and white printing.
Step 0: Currently, you need to install the SSL Certificate first. You can find the instructions in the SSL Certificate (SSL Zertifikat) tab above.
Step 1: Open “Printers & scanners” (for example over the search function) and press “Add a printer or scanner”.

Step 2: After a moment, the option “The printer that I want isn’t listed” will apper. Select it.

Step 3: Enter the printer address (different from the black and white printer): https://cip1.weh.rwth-aachen.de:631/printers/m8124 and press “Next”.

Step 4: Select the drivers for Kyocera ECOSYS M8124cidn XPS and press “OK”. If this driver is not shown, you can either download it from the manufacturers website or use a standard PLC6 driver (for example “Microsoft PCL6 Class Driver”).

Step 5: Finish the installation by pressing “OK”, “Next”, “Finish” etc. (whatever comes up).
Step 6: Go back to “Printers & scanners”, find the new printer (m8124 – see photo) and press “Manage”.
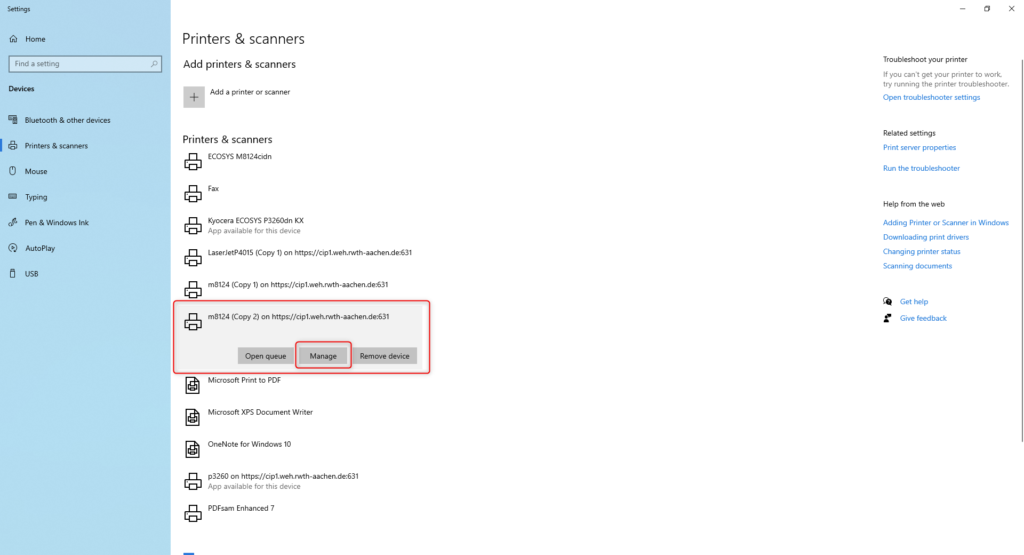
Step 7: Open “Printer properties”->”Ports”, select the correct port and press “Configure Port…”. Then choose “Use the specified user account” and enter your house-username and password (the same for email, booking system etc.). Then press “OK” and “Apply”. [Note: the port will already be set up correctly, when you installed the black and white printer before]

Step 8: Go to “General”->”Preferences…”->”Advanced…” and make sure your default paper format is set to A4. Also change Color Mode to “Auto Color”. Then press “OK”, “Apply”, “Apply”.
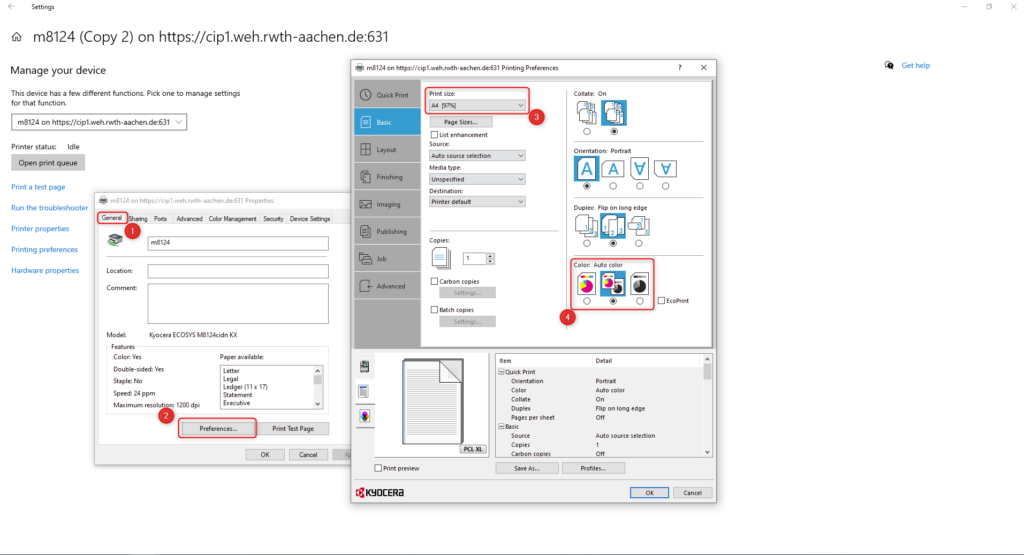
You are all set! Make sure you choose the correct printer when printing documents. Unfortunately, there is currently no cover page when printing with the new drivers.
Step 0: Currently, you need to install the SSL Certificate first. You can find the instructions in the SSL Certificate (SSL Zertifikat) tab above.
Step 1: Go to website https://www.kyoceradocumentsolutions.com/download/index_en.html?r=92 and enter ECOSYS M8124cidn in the search field

Step 2: Choose “MacOS X 10.9 or later” and download the driver
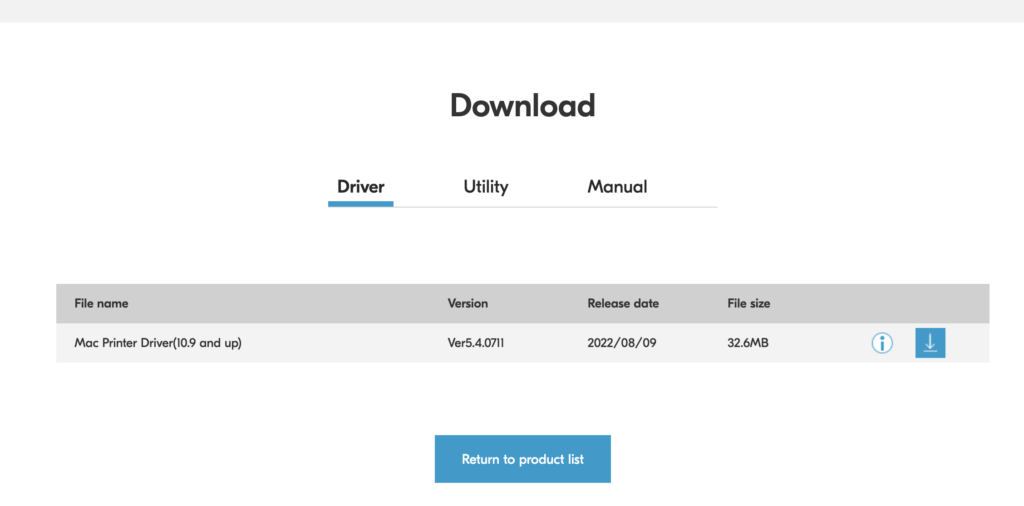
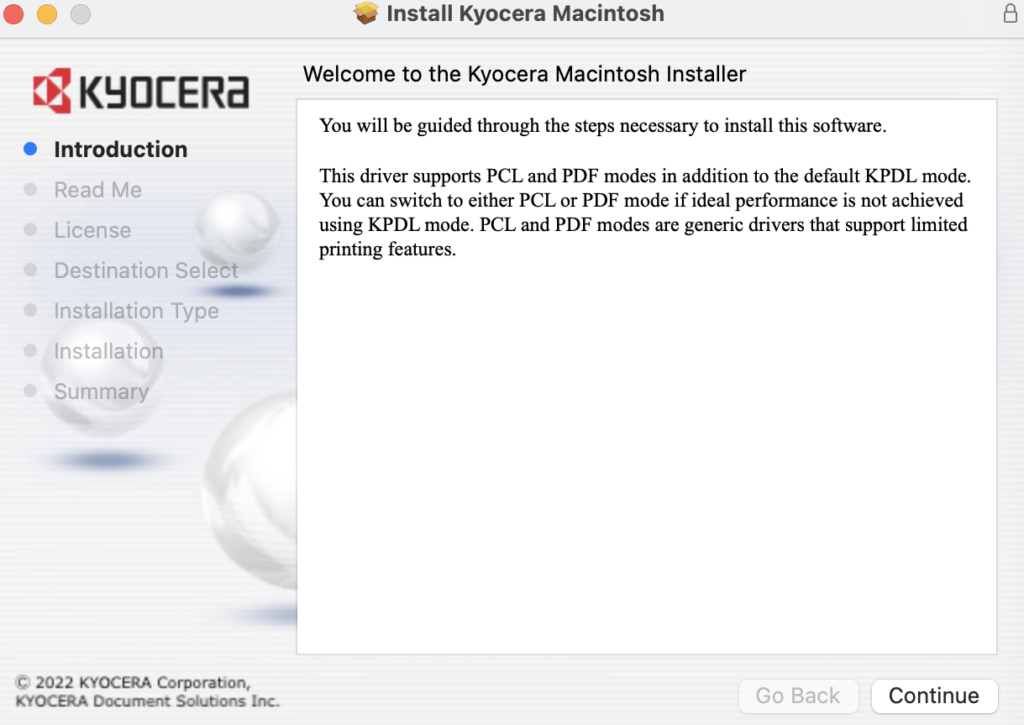
Step 3: Unpack the zip archive and start dmg-file. Click continue n-times and finish the installation.
Step 4: Open settings, choose “Printers & Scanners” and click plus-icon to add a new printer.
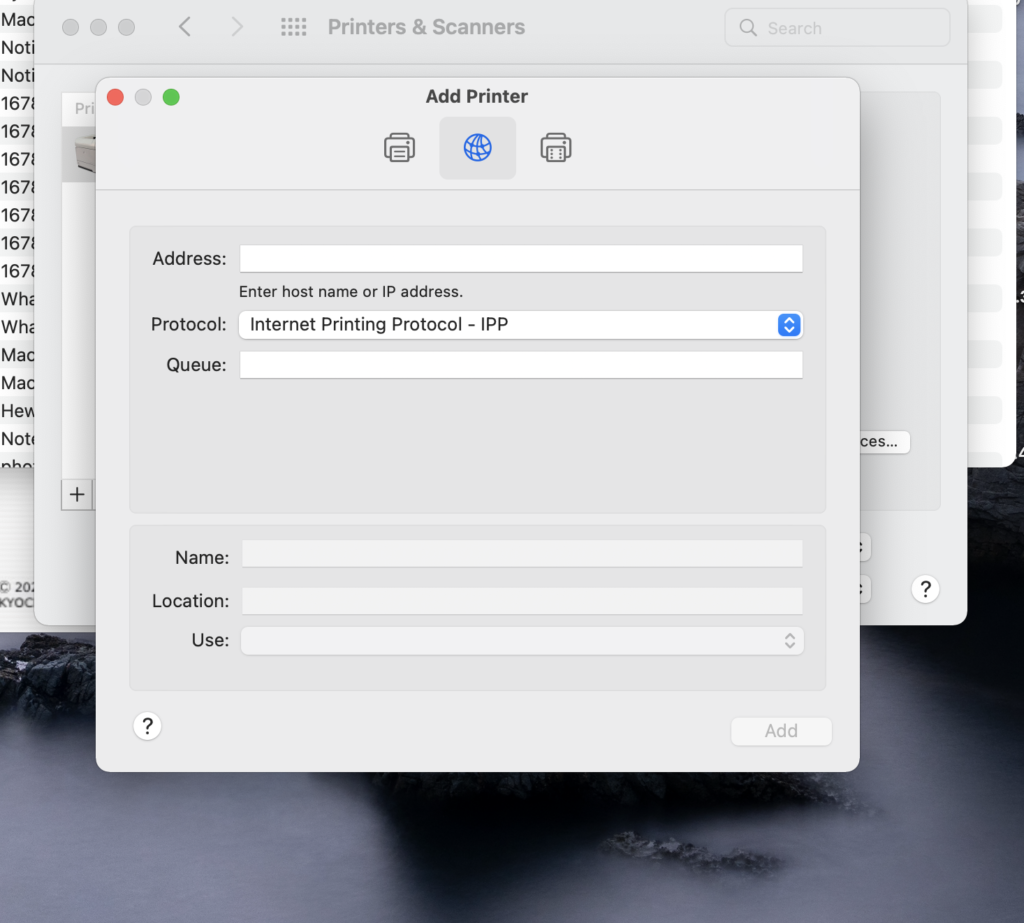
Step 5: Fill the fields as follows and click “add”:
- Address: cip1.weh.rwth-aachen.de:631
- Queue: /printers/m8124
- Name: Farbdrucker
- Location: Lernraum EG
- Use: choose “select software”, search for “Kyocera ECOSYS M8124cidn” and choose it

Step 6: Click n-times on “okay” choose:
- Paper feeders: Two
- Optional disk: RAM disk
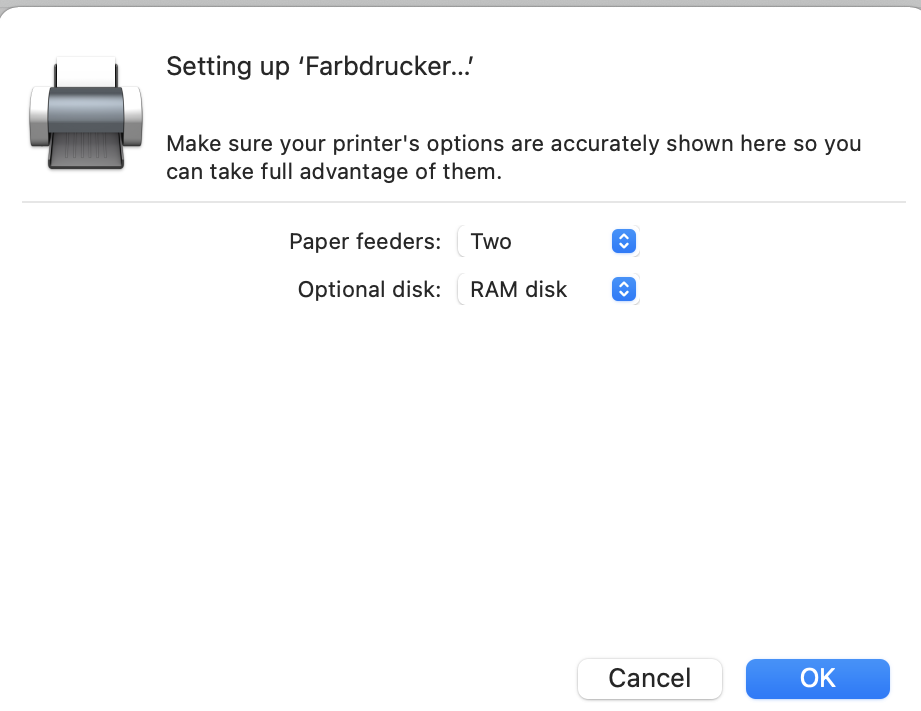
Step 7: Click okay, now you should see the printer in the printer’s list. Choose the document you want to print and click “print”. Open “Print Queue”, you should see the message near the document: “Hold for Authentification”

Step 8: Click on the round button right and enter your credentials in the window and click “okay”:
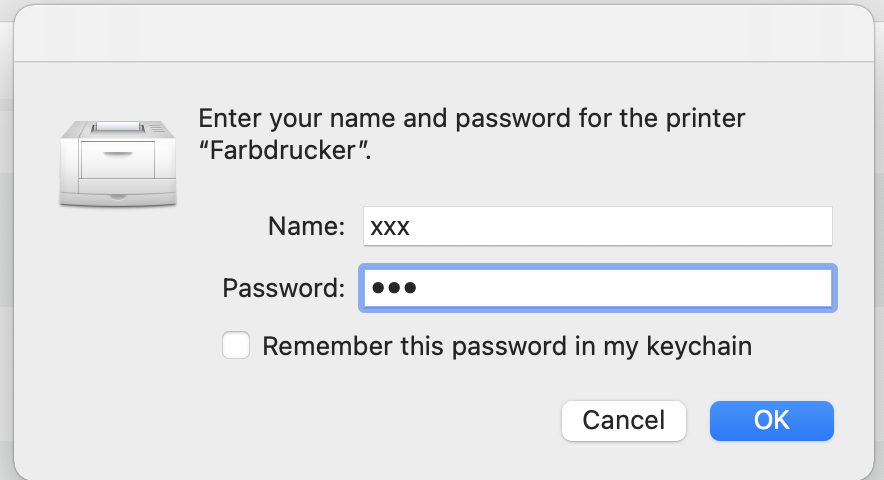
Step 9: Congratulations, you have done this 🙂
DISCLAMER
This is a "legacy feature" that is no longer supported by NetzAG. It is currently not possible for new residents to install the printer. Instead, you can use our web printer, which does not require installation.
Unfortunately, the new SSL certificates from RWTH are not supported on our old print server. These certificates are necessary so that your computer can communicate securely with the print server. Until the new print server is set up, we have created our own SSL certificate as a temporary solution. This certificate must first be added to the list of accepted certificates on your computer. There are several ways to do this, we have listed one here using the browser "Google Chrome". But it works similar in other browsers. It is also possible to do this directly in the OS. This must be done once per device (computer), but works for both printers.
WARNING! It does not currently work via "Firefox" (you can import a certificate with it, but it is configured differently and is therefore not suitable for printing). So far successfully tested browsers are "Google Chrome" and "Microsoft Edge“.
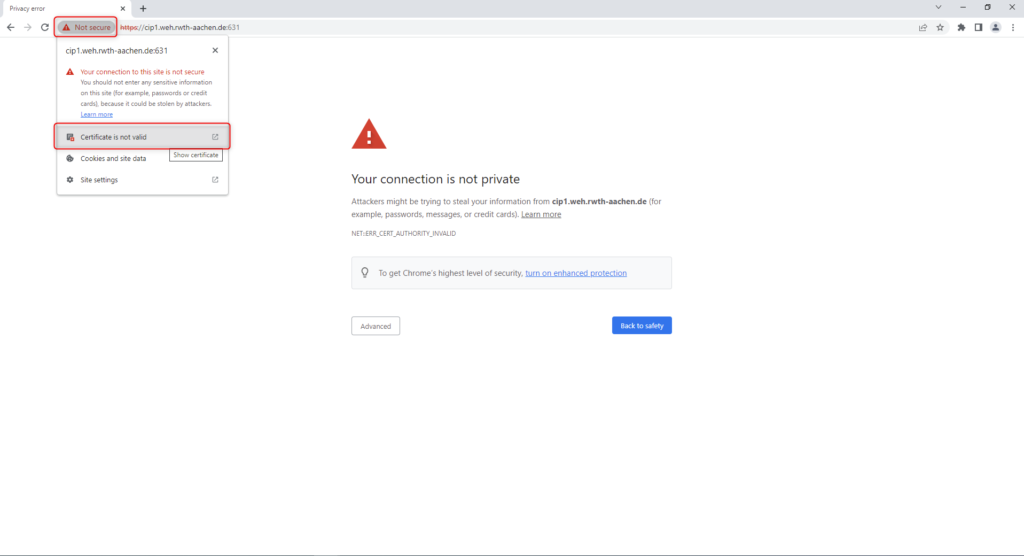
Step 1: Go to the webpage of our printing server https://cip1.weh.rwth-aachen.de:631/. It will say “Not secure” or similar (because your computer does not recognize the certificate). Click on “Not secure” (can be a lock or someting else) and open the certificate.
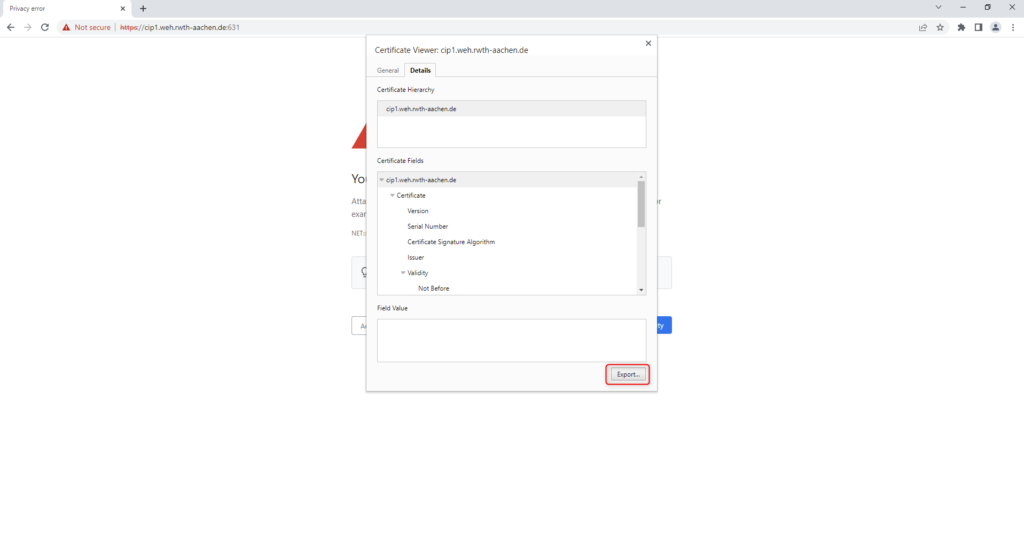
Step 2: Find the button “Export” and save it on your computer.
Step 3: Go to “Settings” in you browser.
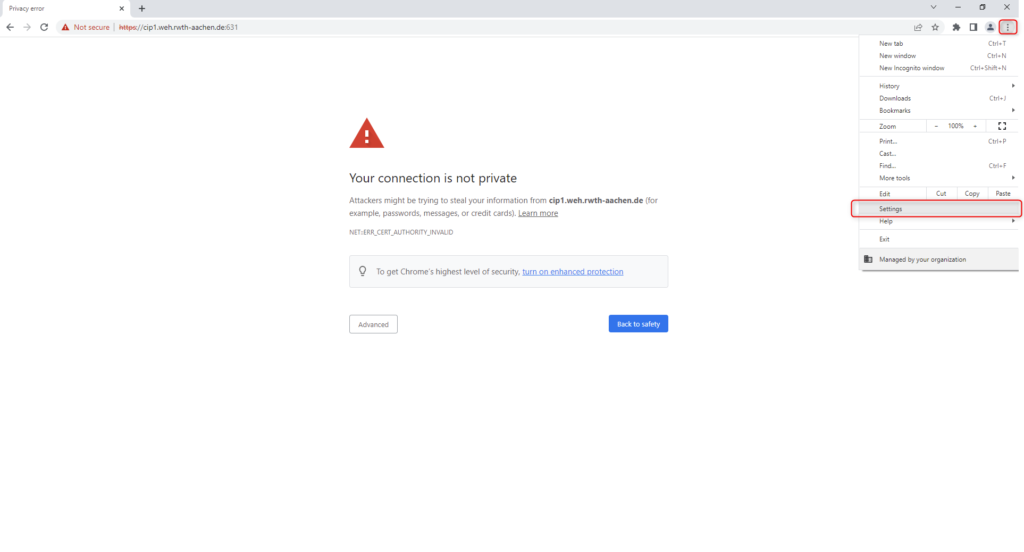
Step 4: Go to “Privacy and security” -> “Security”.
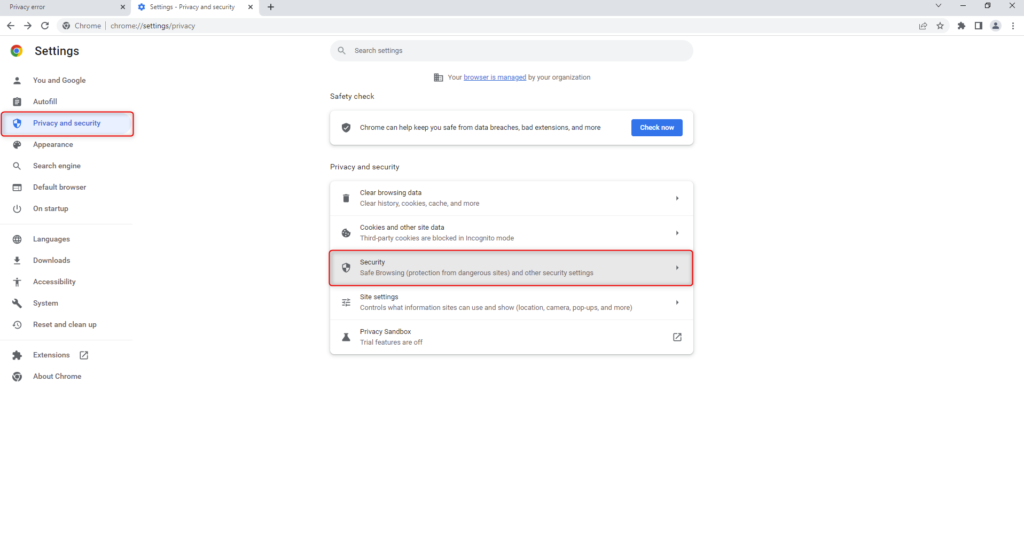
Step 5: Go to “Manage device certificates”.
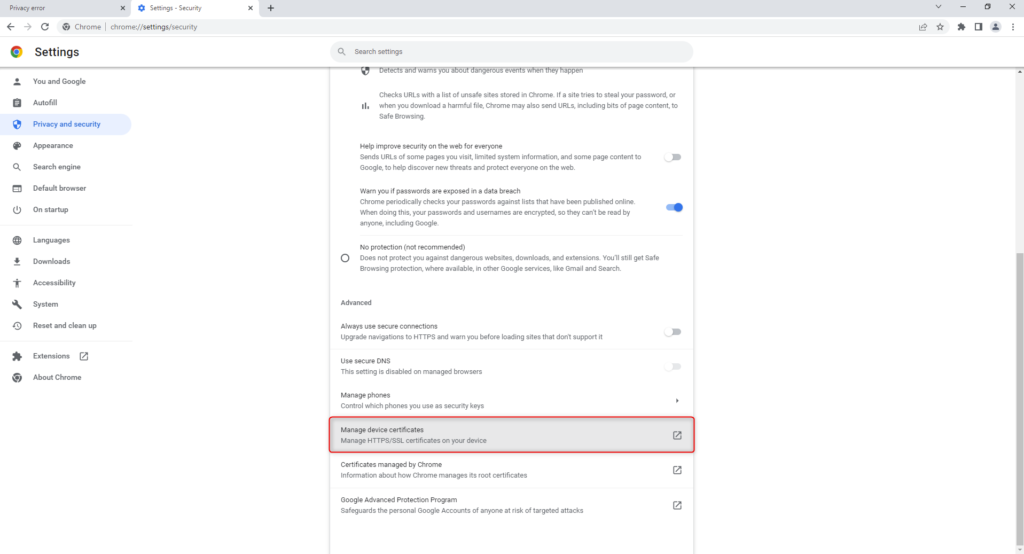
Step 6: Go to “Trusted Root Certification Authorities” and find the “Import” button.
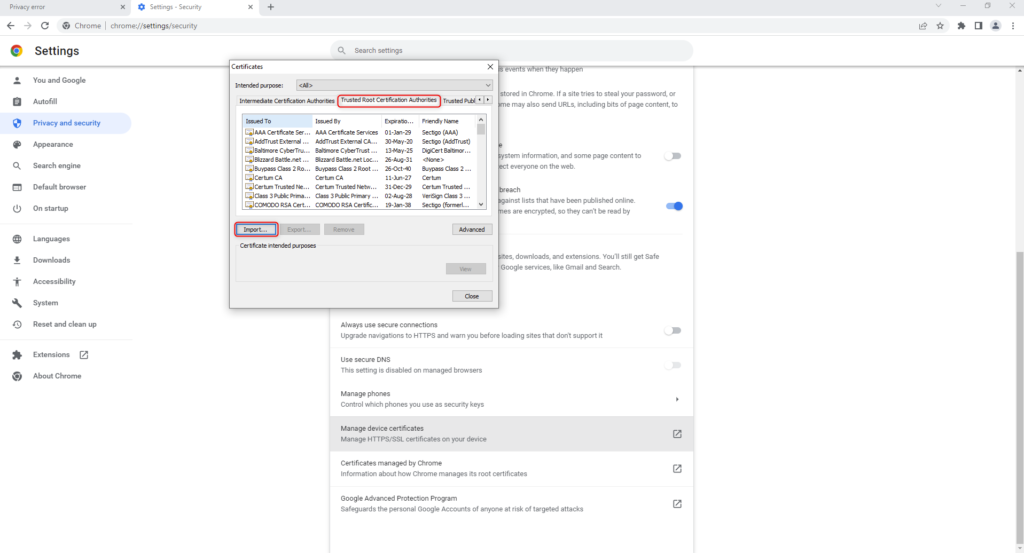
Step 7: After clicking “Next” choose the certificate file you downloaded in step 2, then click “Next” again.

Step 8: Finish the import by clicking “Next” etc. The options below should already be chosen, if not, choose them.

Step 9: At some point you should get a security warning. This is because we signed this certificate ourselves and it was not signed by some well known internet authority. It should however have the same Thumbprint as below if you want to double-check. Click “Yes”.

Now you can install the printer. If you had it installed previously, it should work without further changes.